Agras T70P for Mountain Power Line Capture: Flight Height
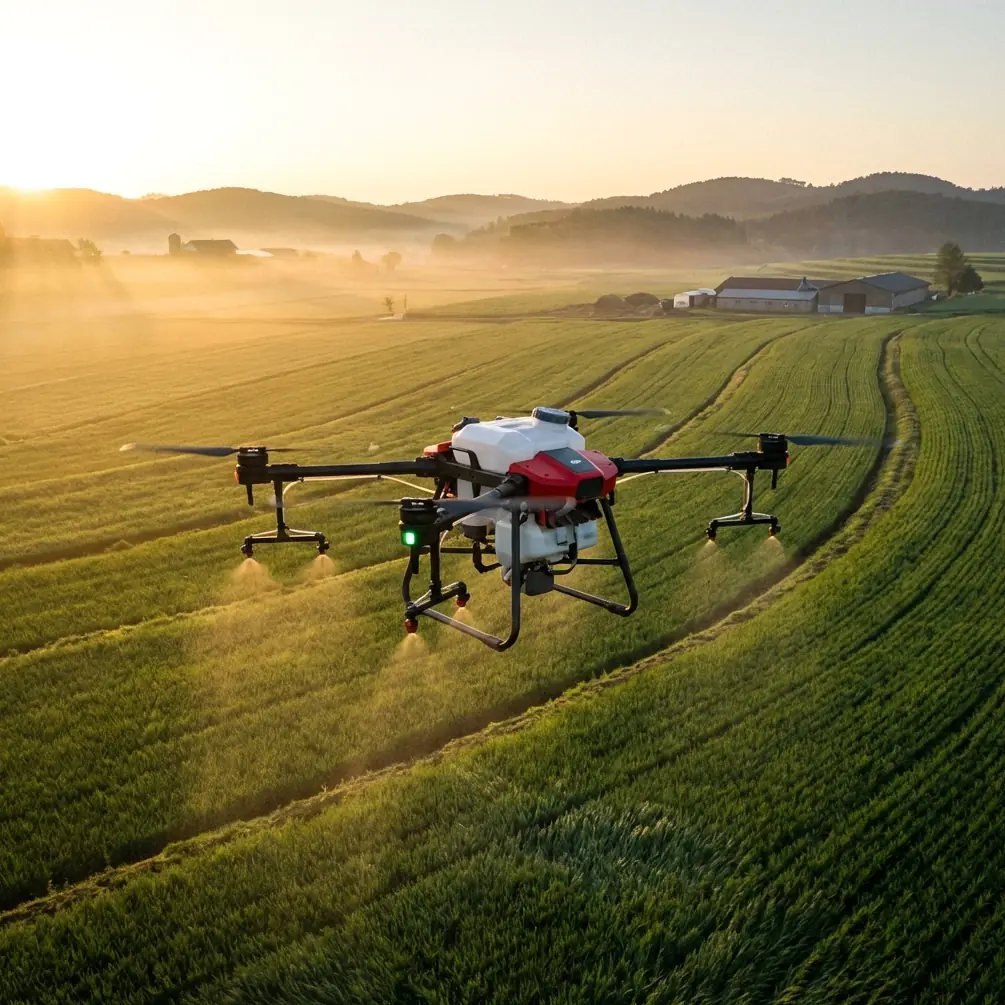
Agras T70P for Mountain Power Line Capture: Flight Height, Payload Logic, and a Practical Field Workflow
META: A field-focused tutorial on using the Agras T70P around mountain power lines, with practical altitude guidance, data-link logic, portability lessons from light UAV survey workflows, and mapping pipeline insights.
Mountain power line work exposes every weak point in a drone operation. Access is awkward. Launch areas are rarely ideal. Wind behaves differently from one ridge to the next. And if your image link stutters or your flight plan is too ambitious for a single battery cycle, the whole job slows down fast.
That is why the most useful way to think about the Agras T70P in this scenario is not as a headline machine with a big name. It is a platform that has to earn its place on a steep slope, in a narrow turnout, with limited setup time and a very specific objective: capture power line corridors cleanly enough for interpretation, documentation, and follow-up analysis.
The reference material behind this discussion does not describe the T70P directly. Instead, it offers two operationally valuable clues from adjacent UAV workflows: first, why small rotary aircraft are preferred when the collection area is constrained and terrain access is difficult; second, why a robust HD transmission chain and a disciplined photogrammetry pipeline matter when visual confidence and deliverable quality are non-negotiable. Those two ideas map surprisingly well to mountain utility capture.
Start with the terrain, not the aircraft brochure
A mountain power line corridor is not an open field. The aircraft may need to launch from a shoulder road, a terrace, a narrow clearing, or a manually accessed point that was chosen because it is simply the only place with enough rotor clearance. One of the source documents highlights why light rotary drones are so often chosen for small-area survey work: they are easy to carry into the field, stable in low-altitude flight, flexible in constrained airspace, and require very little takeoff and landing space.
That point sounds basic, but it drives mission success. In one cited example, a full field kit including the drone, backpack, batteries, and controller came in at about 5 kg. The operational significance is obvious in mountain work. When your crew has to move uphill on foot, or reposition multiple times along a transmission corridor, every extra kilogram becomes a tax on endurance, setup speed, and safety margins.
The T70P sits in a different class from the small survey drones described in that source, but the principle still holds: the more difficult the terrain, the more your workflow should imitate lightweight survey discipline. That means:
- minimize unnecessary accessories at the launch point,
- choose staging areas with the shortest practical carry distance,
- plan shorter, corridor-specific sorties rather than one oversized mission,
- and keep battery swaps, visual checks, and card handling organized enough that the team can move quickly.
In mountain utility capture, portability is not just comfort. It is throughput.
The most useful altitude rule: fly for separation, not for spectacle
The prompt asks for optimal flight altitude insight, and that deserves a direct answer.
For mountain power line capture with the Agras T70P, the right altitude is usually relative to the conductor and tower geometry, not relative to the valley floor. In practice, that means planning around a height band that preserves visual separation from the wires while still producing images detailed enough for inspection context and corridor mapping.
A good working approach is this:
- for corridor overview imaging, stay roughly 20 to 40 meters above the line height where terrain and regulation allow;
- for tower-focused passes, bias toward the lower end of that band if wind is calm and obstacle geometry is predictable;
- if the slope drops away sharply, maintain terrain awareness obsessively and avoid trusting a single absolute altitude value across the whole route.
Why that band? Because mountain power lines create two competing risks. Too low, and the aircraft spends unnecessary time in the same vertical envelope as the conductors and shield wires. Too high, and the line itself becomes visually compressed against the background, especially in harsh sun, haze, or ridge-shadow contrast. That reduces interpretability and makes image review slower.
The reference survey document gives us a useful benchmark from another context: at 100 meters flight height, a 12 MP camera was reported to produce orthomosaic output around 5 cm spatial resolution. Operationally, that tells us something important even though your T70P setup and optics may differ: once you climb too high above the target, detail drops away faster than many crews expect. On power line jobs, the goal is rarely “cover the maximum area.” It is “capture the corridor with enough visual confidence to support decisions.”
So the best altitude is usually the lowest one that preserves safe vertical separation, stable composition, and a comfortable control margin in the local wind field.
Why the data link matters more in mountains
One source document describes an HD digital transmission system capable of 1920×1080 at 60P/50P, with a stated transmission distance of 5 km at 100 m, and a ground station designed for visibility in strong light. It also lists an end-to-end latency of 500 ms on the receiving side.
Those numbers are not there for trivia. They point to the real bottleneck in mountainous capture: seeing enough, soon enough, to make good decisions.
Power line work in mountain terrain is almost never just “fly the route and sort it out later.” The pilot and observer need reliable live view for at least four reasons:
Wire-background contrast changes constantly.
A line visible against rock may disappear against forest, then reappear against open sky.Micro-topography distorts perception.
When the aircraft crosses a ridge shoulder, a safe-looking geometry can tighten quickly.Route continuity depends on confidence.
A pilot who trusts the image link can keep the mission smooth. A pilot who does not trust it slows down, hesitates, or aborts segments.Strong sunlight is a real obstacle.
The source specifically mentions a high-brightness display suitable for bright conditions. That matters on exposed slopes where reflections and glare can ruin situational awareness.
For a T70P operator, the lesson is simple: do not judge the mission only by aircraft endurance or camera specs. Judge it by the weakest link in the visual chain. If your display visibility, relay position, antenna orientation, or monitoring workflow is poor, mountain line capture becomes less precise long before the aircraft reaches its performance limits.
Break the corridor into survey logic, not inspection improvisation
The second source also references a Pix4Dmapper workflow with outputs such as orthomosaics in GeoTIFF, DEM, point clouds, 3D models, ground control editing, and automatically generated accuracy reports. Even if your final power line deliverable is not a formal mapping package, this still matters.
Why? Because mountain line capture benefits from survey structure.
A disciplined workflow has three layers:
1. Reconnaissance layer
Fly a higher, wider pass to understand terrain relief, line alignment, tower spacing, access points, and sun angle problems.
2. Corridor layer
Fly the actual route with overlap and consistency in mind. Keep framing predictable enough that the dataset can support stitching, referencing, or repeated comparison over time.
3. Feature layer
Collect targeted imagery of towers, crossings, slope instability indicators, vegetation encroachment zones, or hardware of interest.
This layered method is stronger than a single improvised flight because it creates options. If the utility team later asks for a mapped corridor strip, you may already have enough structured imagery for orthomosaic or 3D reconstruction. The source software list is a reminder that drone capture should not stop at “we recorded video.” A usable corridor dataset often becomes more valuable once it can be processed into spatial products.
A practical T70P field workflow for mountain power lines
Here is a tutorial-style workflow I would recommend.
Step 1: Choose launch points like a surveyor
Do not pick the spot with the best view. Pick the spot with the best total operation value:
- enough rotor clearance,
- a safe recovery path,
- reliable GNSS exposure,
- minimal dust or loose debris,
- and short walking distance to the segment you need to capture.
In mountain work, two smaller launch points often outperform one “central” point that forces long oblique flights.
Step 2: Define altitude by wire clearance and slope breaks
Before takeoff, identify the highest local obstacle in the next segment: tower top, conductor catenary rise, tree line on the uphill side, or a ridge lip. Then set your working height to maintain comfortable separation above that geometry.
For overview capture, the earlier 20 to 40 meter buffer above line height is a good starting window. If the route bends around terrain or enters a saddle where wind accelerates, widen your margin rather than trying to preserve a fixed cinematic composition.
Step 3: Keep each sortie battery-realistic
The small UAV source noted that one battery could satisfy a sample plot orthophoto collection task, and that a 23-minute theoretical flight time was enough for that use. The number is not directly transferable to the T70P, but the planning principle absolutely is: build each mission around useful work per battery, not theoretical endurance.
Mountain flights consume margin through climbing, repositioning, hover checks, and weather adaptation. If your planned segment only works on paper when every minute goes perfectly, it is too long.
Step 4: Watch live view like it is a sensor, not a convenience
Use the feed to confirm three things continuously:
- line visibility against the background,
- spacing between aircraft and vertical terrain features,
- and continuity of corridor framing.
The HD link benchmark from the source, 1080p transmission, is a reminder that image quality during flight affects collection quality after landing. If the feed becomes marginal, do not assume the onboard recording will save a poorly controlled pass.
Step 5: Capture for processing, even if processing is not yet requested
If there is any chance the client will want spatial outputs, preserve overlap, maintain steady speed, and avoid erratic framing. That keeps the door open for downstream products similar to those listed in the source workflow: orthomosaic, DEM, point cloud, and 3D model generation.
This is where a lot of utility capture teams leave value on the table. They collect “viewable” imagery instead of “processable” imagery.
Step 6: Log environmental variables
The prompt includes hints like RTK fix rate, centimeter precision, swath width, nozzle calibration, spray drift, multispectral, and IPX6K. Not all of these belong at the center of a power line imaging task, but some do reflect a broader truth about the T70P class of operations: repeatability comes from measurement discipline.
For this scenario, the most relevant habits are:
- log GNSS/RTK status throughout the mission,
- record wind exposure by segment,
- note sun angle and ridge shadow effects,
- and document any terrain-induced signal weakness.
Centimeter-level positioning is not just a buzz phrase. Along a mountain corridor, stable georeferencing is what allows repeated flights to be compared with less ambiguity.
What to ignore from agricultural habits, and what to keep
Because the T70P sits in an agricultural family, operators sometimes carry over the wrong assumptions into imaging work.
Do not center the mission around agricultural metrics like spray drift or nozzle calibration here; they are irrelevant to line capture itself. But do keep the operational discipline that agricultural crews tend to develop:
- precise pre-flight checks,
- repeatable route setup,
- weather awareness,
- and respect for payload-specific limitations.
That discipline is useful in mountains, where casual flying gets punished quickly.
Building a better deliverable
If your final objective is a usable mountain power line record, the strongest deliverable package is usually a combination of:
- stabilized corridor video for fast review,
- stills of key structures and terrain transitions,
- geotagged flight records,
- and, where the dataset supports it, mapped outputs from a photogrammetry pipeline.
The source software stack is a useful model here. Tools that can generate GeoTIFF orthomosaics, DEM outputs, point clouds, and automatic accuracy reports turn one flight into several analytical products. That is especially valuable when vegetation encroachment, access road condition, erosion, or tower surroundings matter as much as the conductors themselves.
Final thought: mountain success comes from modest decisions
The best T70P mountain power line missions are usually not flashy. They are carefully limited. The pilot chooses an unglamorous launch point. The flight altitude stays conservative. The route is broken into manageable corridor segments. The live view is treated as mission-critical. And the imagery is captured in a way that can support both immediate review and later mapping.
That is what the reference materials, taken together, really suggest. One document emphasizes the value of compact, low-altitude rotary operations where access is hard and launch space is scarce. The other emphasizes dependable HD transmission and a processing pipeline that transforms flight imagery into spatial products. Put those together, and you get a very practical framework for using the Agras T70P around mountain power lines.
If you are setting up this kind of workflow and want a second opinion on route planning, altitude bands, or data capture structure, you can message our technical team here.
Ready for your own Agras T70P? Contact our team for expert consultation.